

Supplements to Member Lectures
GA 246
13 August 1914, Dornach
Translated by Steiner Online Library
65. First Aid Course: Bandaging Course One
[ 1 ] There are two types of bleeding wounds:
[ 2 ] 1. Arterial blood. This is bright red and flows in streams or gushes; it spurts. In this case, the bandage must be applied from the wound toward the heart, that is, on the limbs from the bottom up. The end of the bandage is [split], knotted, and the two outer ends are wrapped around the bandage and tied tightly—not over the wound!
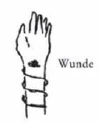
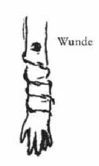
[ 3 ] 2. Venous blood. This is dark red or bluish. First, the wound itself must be bandaged (as described above, but only covering the wound itself), and second, blood flow must be occluded in such a way that the wound is located between this first bandage and the rest of the body [(i.e., in the case of an arm, below the wound)]. This should not be done for too long; if stiffness or blue discoloration of the fingers occurs, the bandage should be loosened.
[ 4 ] 3. Head wound. Wrap the bandage around the head several times, then bring it in the opposite direction by folding it vertically. Secure the point where this occurs with the following wraps. Make more wraps across the wound than perpendicular to it! Finally, secure it with a safety pin, preferably at the top of the head (but not directly over the wound!).

[ 5 ] In all three cases, gauze should be applied to the wound first, followed by cotton wool. [It is best to apply gauze first, then cotton wool.]
[ 6 ] In the first and second cases, or if the arm is broken, first wrap it in a cloth. Use a triangular cloth, or if it is rectangular, fold it in half. Place the hand of the affected arm on the tip of the cloth, fold it over, and drape one of the other two tips over the shoulder (for the left arm, over the right shoulder) and the other over the opposite shoulder [(i.e., the left shoulder in this case)]. Tie the ends together at the back. First, wrap the end of the last corner slightly around the hand. You can secure the hand and the cloth together with a safety pin so that you can raise the hand or arm.
[ 7 ] If the wound is bleeding arterial blood, the arm must be held elevated while applying the dressing. If there is no one nearby who can assist, the arm should be propped up on something.
[ 8 ] Wounds must be kept still; do not rinse them with too much water! If they become dirty, they should first be cleaned with an antiseptic or aseptic agent (wash your hands aseptically for five minutes first; boil instruments and so on!). If the wound is not dirty, then you should leave it completely alone. You can clean the area around the wound thoroughly. All antiseptic agents and the like significantly inhibit the body’s natural healing process. The primary healing power comes from the body itself. 4. If no bandages are available to apply pressure, firmly compress the artery above the wound (radial, brachial, or carotid artery) for about 10 to 15 minutes.
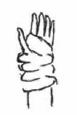
[ 9 ] 5. For a broken wrist, use a fairly wide, sturdy bandage. Extend the hand fully. Start wrapping with the hand. Wrap the first turn diagonally over the thumb, then wrap the hand without the thumb. As you go higher, fold the bandage over each time. Leave the elbow exposed and wrap the bandage slightly beyond the elbow [; secure with safety pins]. In an emergency, any piece of cloth can be used.
[ 10 ] 6. Broken lower leg. Quickly cut the shoe and sock off. Have the person hold their foot firmly and keep the leg fully extended. Wrap a large piece of cotton wool around the leg. Then place a piece of wood, a stick, an umbrella, or anything else that is as flat as possible beneath and to the right and left of the leg. Secure it in three different places with bandages cut into strips (1. above the knee, 2. at the ankle, 3. in the middle—just not at the fracture site). Tie the knots on the wood, not on the leg.
[ 11 ] Elevate the leg. Place a pillow or something similar under the leg.
[ 12 ] 7. Fractured skull. Cut away the hair or, in an emergency, comb it away. Place a cloth—cut open on the left and right sides—over the head, tying the front corners together in a cross behind the head and the back corners in front of the head. First, tie the back corners together at the front, as this provides stability. The same method can be used for a head wound if bandages are unavailable—but of course, apply gauze or cotton wool first. It can also be used for chin injuries. Simply place the top corners behind the head and the bottom corners over the head (but crossed).
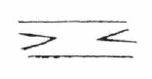
[ 13 ] 8. Nose injury or damage. Apply gauze and cotton wool, then wrap a bandage around the nose and vertically over it. Wrap around the ears as with a head wound, or use a split bandage as described above.