

Supplements to Member Lectures
GA 246
15 August 1914, Dornach
Translate the original German text into any language:
Versions Available:
Supplements to Member Lectures, tr. SOL
68. Samariterkurs Verbandkurs II
68. First Aid Course: Bandaging Course Two
[ 1 ] 9. Schusswunden beim Schlüsselbein: Gaze, Watte, breiter Verband. Zuerst über die Schulter, wo die Wunde ist, und unter dem anderen Arm, dann um den Körper herum (nicht zu tief). Während des Verbindens muss die Schlagader daselbst (bei der ersten oberen Rippe, gleichsam im Schlüsselbein) von einer anderen Person fortwährend zugehalten werden.
[ 1 ] 9. Gunshot wounds to the collarbone: gauze, cotton wool, wide bandage. First over the shoulder where the wound is and under the other arm, then around the body (not too tightly). While applying the bandage, the artery in that area (near the first upper rib, as it were in the clavicle) must be continuously compressed by another person.
[ 2 ] Man kann auch zuerst ein Stück Watte auf die Schlagader drücken und dieses extra festbinden in derselben Weise, wie oben angegeben (aber etwas höher, nicht um den Körper herum). Dieses wäre zu tun, wenn nur eine Person anwesend ist. Im Allgemeinen ist es am besten, zuerst die Ader abzubinden und dann erst die Wunde zu verbinden.
[ 2 ] You can also first press a piece of cotton wool against the artery and tie it extra tightly in the same way as described above (but slightly higher up, not around the body). This should be done if only one person is present. In general, it is best to tie off the artery first and then bandage the wound.
[ 3 ] 10. Rippenbruch: Großes Stück Watte, sehr breiter Verband, um den Mittelkörper herumlegen. Dann eine Art Träger über die Schultern, mit Sicherheitsnadeln vorn und hinten an den Verband festgemacht (hinten eine Nadel, vorne zwei), sodass der Verband sich nicht verschieben kann.
[ 3 ] 10. Broken rib: Place a large piece of cotton wool and a very wide bandage around the midsection. Then create a sort of sling over the shoulders, securing it to the bandage at the front and back with safety pins (one pin at the back, two at the front) so that the bandage cannot shift.
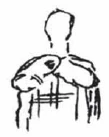
[ 4 ] 11. Gebrochenes Schlüsselbein: Man kann den Bruch erkennen durch Vergleichen mit dem anderen Schlüsselbein. Ein schmaler Verband wird um die rechte Schulter nahe beim Halse geknüpft (wenn es sich um das rechte Schlüsselbein handelt) und unter dem linken Arm durchgezogen. Watte dazwischenlegen! Ein dreieckiges Tuch wird auf die rechte Schulter gelegt, mit einer Spitze unter dem Verband, beim Hals durchgezogen; die beiden anderen Spitzen werden auf dem Arm zusammengeknüpft.
[ 4 ] 11. Broken collarbone: You can identify the fracture by comparing it to the other collarbone. Tie a narrow bandage around the right shoulder close to the neck (if the right collarbone is broken) and pull it under the left arm. Place cotton between the bandage and the skin! Place a triangular bandage on the right shoulder, with one corner tucked under the bandage and pulled through at the neck; tie the other two corners together on the arm.
[ 5 ] 12. Unterleibsverletzung: Treten die Eingeweide heraus, dann soll man sie ja nicht berühren, nur zudecken. Sonst wird der Verletzte auf den Boden gelegt und ein fester, sehr breiter Verband um den Unterleib gelegt. Beim Hinaufheben müssen die Beine kreuzweise zusammengehalten werden; sie dürfen durchaus nicht auseinandergehalten werden.
[ 5 ] 12. Abdominal injury: If the intestines are protruding, do not touch them; simply cover them. Otherwise, lay the injured person on the ground and wrap a firm, very wide bandage around the abdomen. When lifting the victim, the legs must be held together in a crossed position; under no circumstances should they be held apart.
[ 6 ] 13. Künstliche Atmung: Der Patient wird hingelegt, der Mund geöffnet, die Zunge mit der Hand aus dem Mund gezogen. Arme auf und ab bewegen. Die Arme werden knapp unter dem Ellbogen angefasst, an den Brustkorb angedrückt und dann über den Kopf hinaus gestreckt. Ist eine zweite Person anwesend, dann drückt diese auf den Magen beim Ausatmen, das heißt, unmittelbar bevor die Ellbogen wieder den Körper berühren. Die Zunge soll inzwischen festgehalten werden; da die Gefahr des Beißens besteht, soll dies mit einem Tuch geschehen, oder man stecke einen Kork zwischen die Zähne (es wären im ersten Fall mindestens zwei Personen notwendig). Tempo: Vier bis fünf Sekunden für einmaliges Hin- und Herbewegen, das heißt also: ziemlich langsam. Kein Kissen unter den Kopf legen, sondern unter den Oberkörper, dass der Kopf hinten überhängt.
[ 6 ] 13. Artificial respiration: Lay the patient down, open the mouth, and pull the tongue out of the mouth with your hand. Move the arms up and down. Grasp the arms just below the elbows, press them against the chest, and then stretch them out over the head. If a second person is present, they should press on the stomach as the patient exhales—that is, immediately before the elbows touch the body again. Meanwhile, the tongue must be held in place; since there is a risk of biting, this should be done with a cloth, or a cork should be placed between the teeth (in the first case, at least two people would be necessary). Pace: Four to five seconds for a single back-and-forth movement, meaning: fairly slowly. Do not place a pillow under the head, but rather under the upper body so that the head hangs over the edge.
[ 7 ] 14. Behandlung einer Ohnmacht: Nichts in den Mund gießen oder dergleichen. Beine hochlegen über ein aufgerichtetes Brett unter den Knien oder etwas dergleichen und die Füße auf einen Stuhl. Die Kleider alle öffnen. Es werden entweder die eben beschriebenen Bewegungen gemacht oder mit einem Tuch der Magen und unter den Waden gerieben. Im Notfall etwas riechen lassen, Salmiak und so weiter, im Übrigen abwarten! 15. Sonnenstich: Den Patienten in den Schatten legen, Kleider öffnen, etwas Salzwasser eingeben oder auch etwa einen halben Löffel Salz, wenn es wenigstens im Munde schmilzt. Die Körperstellung umgekehrt wie im vorigen Fall: der Kopf hoch, die Füße tief (dies ist auch bei epileptischen Anfällen zu empfehlen). Das Salzwasser kann auch auf dem Körper appliziert werden, nämlich am Haupt. Auch kann das Haupt mit Zitronensaft eingerieben werden.
[ 7 ] 14. Treatment for fainting: Do not pour anything into the mouth or do anything similar. Elevate the legs by placing a board under the knees or something similar, and rest the feet on a chair. Unbutton all the clothing. Either perform the movements just described, or rub the stomach and the area below the calves with a cloth. In an emergency, let the patient smell something—ammonia, for example—but otherwise wait and see! 15. Sunstroke: Place the patient in the shade, loosen their clothing, and give them some salt water or about half a spoonful of salt, provided it melts in the mouth. The body position is the opposite of the previous case: the head elevated, the feet lowered (this is also recommended for epileptic seizures). The salt water can also be applied to the body, specifically to the head. The head can also be rubbed with lemon juice.